

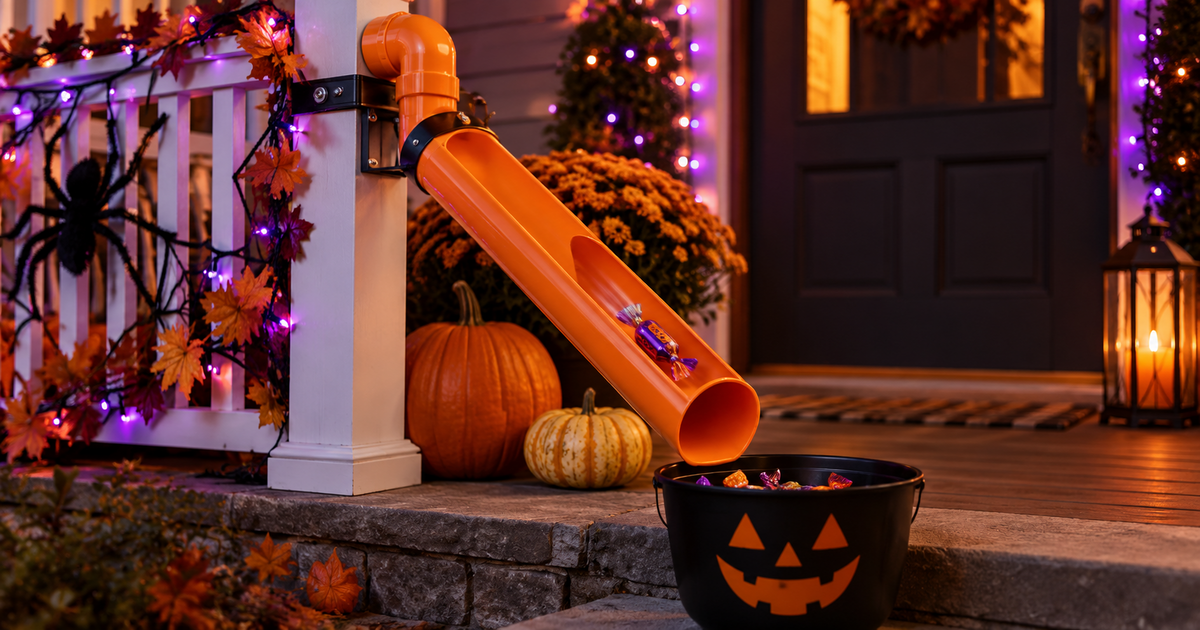
How to Build a DIY Halloween Candy Chute
A DIY candy chute is a length of 2-inch PVC pipe angled down from a porch railing, window, or step on a simple frame of legs cut from smaller PVC, so candy slides straight into a trick-or-treater’s bag without anyone reaching into a shared bowl. A basic build uses about 5 feet of 2-inch pipe, two PVC wye fittings, roughly 5 feet of 1½-inch pipe for the frame legs, plus tees and caps — most versions go together dry, with no glue, so you can break it down flat and reuse it every year.
Haunt Harvester is reader-supported and may earn a commission from qualifying purchases made through links on this page, at no extra cost to you. We only feature products we would tell a friend about.
Candy chutes caught on as a hands-off way to hand out treats, and they have stuck around for a simpler reason: kids love them. A chute turns a routine porch hand-off into a mini ride for the candy, keeps your hands out of a bowl a hundred strangers are also reaching into, and speeds up a busy Halloween night when you have a steady stream of trick-or-treaters at the door. If you want to browse decorating supplies to dress yours up once it is built, you can browse our Halloween decor picks on Amazon — the chute itself is built almost entirely from PVC pipe and fittings off a hardware-store shelf.
What parts do you need to build a candy chute?
The classic build uses 5 feet of 2-inch PVC pipe for the main channel candy slides down, plus two 2-inch-to-1½-inch PVC wye fittings to angle the frame legs off each end. The legs themselves use roughly 5 feet of 1½-inch pipe cut into four 12-inch segments, joined with 1½-inch tees and finished with end caps so nothing has a sharp open edge.
| Part | What it’s for | Typical price |
|---|---|---|
| 2-inch PVC pipe (5 ft) | The main chute channel candy slides down | $8–$15 |
| 2″x1½″ PVC wye fittings (2) | Angles the support legs off each end of the main pipe | $6–$12 (pair) |
| 1½-inch PVC pipe (5 ft) | Cut into legs that hold the chute at the right height and slope | $6–$12 |
| 1½-inch tees & end caps | Joins and caps the leg frame so it stands on its own | $8–$15 (set) |
How do you put it together?
- Cut one 1½-inch pipe into four 12-inch leg segments and set the remaining full 5-foot length of 1½-inch pipe aside for later.
- Dry-fit a wye fitting onto each end of the 2-inch main pipe, with the 1½-inch outlet on each wye pointing downward in the same direction, so the finished chute angles downward end to end.
- Insert one 12-inch leg segment into the left wye’s outlet, and the remaining full-length 1½-inch pipe into the right wye’s outlet — the difference in leg length is what sets the chute’s slope from top to bottom.
- Attach a 1½-inch tee to the open end of each of those two pipes, using the tee’s center hub.
- Push the remaining four 12-inch leg segments into the open sockets of the two tees, then cap every leg end so there are no sharp open pipe edges.
- Stand it up and fine-tune the slope by adjusting how far each leg is inserted, then test it with a piece of candy before trick-or-treaters arrive.
How do you make it look spooky?
Bare PVC does the job but will not win any curb-appeal points, so most home haunters paint the tube black, purple, or orange with spray paint rated for plastic, then zip-tie a stretch of fake spiderweb or a plastic spider near the top opening. A battery-powered LED strip taped along the inside of the tube lights the candy’s path down without any wiring into your house power, and a small hand-lettered sign (“Feed Me” or a simple arrow) tells guests what to do at a glance. If you are looking for more small-footprint build ideas that fit a porch or apartment balcony, our small-space DIY prop guide covers the same scale of project.
Keep it stable and sanitary: build the leg frame wide enough at the base that it cannot tip when kids bump it or lean in reaching for candy, and keep the chute away from stair edges so nobody trips going for it. If your porch railing already gives you a sturdy mounting point, zip-tying or bracket-mounting the chute to the railing is more stable than a freestanding leg frame alone. On a busy night, a quick wipe of the tube’s opening with a sanitizing wipe between groups is an easy extra step if you want it.
Do you need to glue the PVC together?
No — a dry-fit build (no glue or primer) is sturdy enough for a seasonal chute you want to store and reuse; friction and gravity hold the pieces together at these low loads, and dry-fit joints pull apart afterward for flat storage. Only glue the joints if you want a permanent, year-round fixture, and keep in mind that a glued chute cannot be resized or broken down later the way a dry-fit one can. If you are budgeting the whole build, our budget home haunt guide has more low-cost material swaps that apply here too.
Frequently Asked Questions
How long should a candy chute be? Most home builds run about 5 feet of main pipe, angled from porch or railing height down to roughly waist height for kids at the bottom.
Do I need to glue the PVC pipe together? No — most builds are dry-fit for the season and pulled apart for storage; only glue it if you want a permanent, non-adjustable fixture.
Will a candy chute work without a railing to mount it to? Yes, a four-legged PVC frame like the one above is freestanding, though mounting to a railing or porch post adds extra stability.
How do I clean it between trick-or-treaters? A quick wipe with a sanitizing wipe or spray at the opening between groups is the easiest option if you want an extra layer of cleanliness on a busy night.
Can I make the chute glow or light up? Yes — a battery-powered LED strip taped along the inside of the tube is a popular add-on that lights the candy’s path without any wiring into your house power.
Building more than just a candy chute this year? Start with our home haunt beginner’s guide.

As an Amazon Associate we may earn commission from qualifying purchases at no extra cost to you.
new in halloween animatronics
Our honest Spirit Halloween 4 Ft 4 In Harvey Carvey review: a jack-o-lantern-headed creepy kid with knife and spoon for $165.99. We score it 3.5 of 5.
Our honest Spirit Halloween 6 Ft 11 In Lady Misfortune review: a near-7-foot color-changing witch with a crystal ball for $109.99. We score it 3.4 of 5.
Our honest Spirit Halloween 9 Ft 5 In Sinister Straw Man review: a $385.99 giant that springs up to 9 feet with glowing eyes. We score it 3.6 out of 5.
Find Haunted Houses in:
trending in haunt industry
Everything you need to know about East Coast Haunters Convention 2026 — dates, location, what to expect, haunt tours, seminars, and how to get tickets before prices increase.
HalloweenCostumes.com's 2026 Fan Design Program lets you design a real Halloween animatronic. Two winners get 10 props each plus 5% revenue. Submissions close April 30.
ShudderCon 2026 runs April 25–26 at Camp Jordan Arena in East Ridge, TN. Tickets from $15–$75. Here's the full preview for horror fans, haunt pros, and scare actors.