

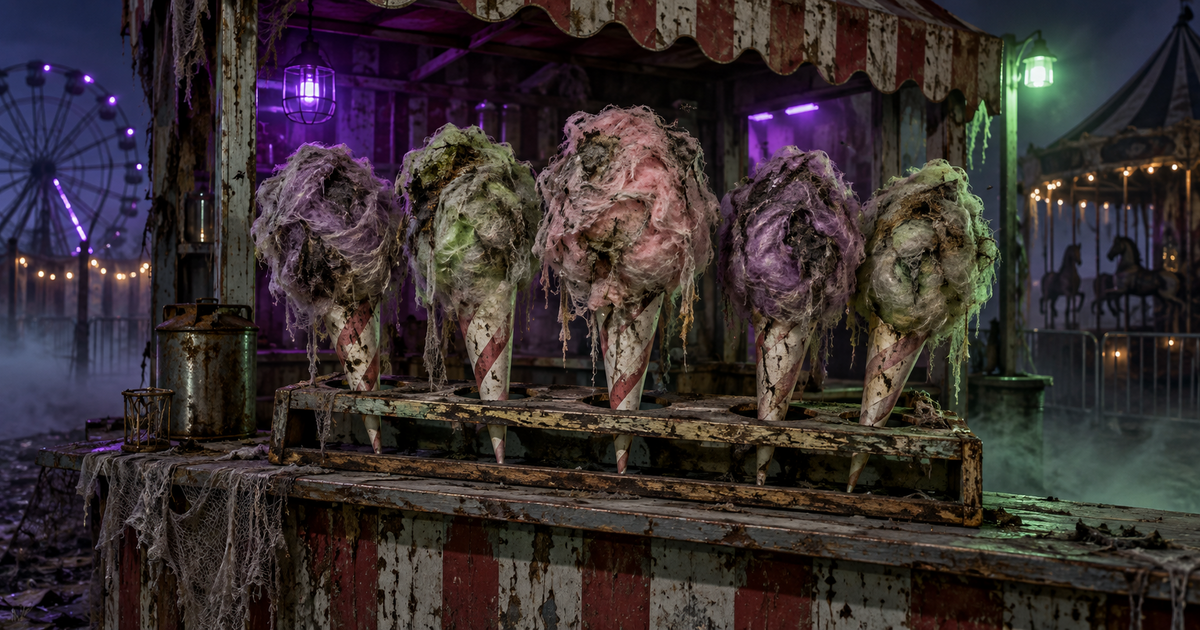
How to Make Rotten Candy: A DIY Creepy Cotton Candy Prop for Your Carnival Scene
To make “rotten candy,” tease out polyester fiberfill into airy cotton-candy tufts, spray it in sickly, faded colors, wrap it around paper cones on a stick, then age it with a brown wash and a few fake flies. It is a non-edible decoration — a decayed carnival concession prop, never real food — that costs only a few dollars per cone, takes an afternoon, and is beginner-friendly. It is one of the fastest ways to make a creepy carnival or circus scene feel abandoned and wrong.
Nothing says “something went very wrong at this carnival” like a cone of cotton candy that has gone gray, matted, and fly-blown. Rotten candy is a prop haunters love because it reads instantly — everyone knows what fresh cotton candy should look like, so a decayed version lands as unsettling without a single drop of fake blood. It is cheap, light, and reusable, and it slots straight into a creepy midway alongside a dead clown, a crooked ticket booth, or flickering bulbs. This guide covers the full build, from fluffing the fibers to lighting the finished display.
What materials and tools do you need?
Everything here comes from a craft store or the sewing aisle, and most of it is reusable year to year. A single bag of fiberfill makes several cones.
| Item | What it does | Notes |
|---|---|---|
| Polyester fiberfill (poly-fil / pillow stuffing) | The cotton-candy body | Tease it apart so it looks spun, not clumped |
| Paper cones or rolled card stock | The classic cotton-candy cone | Roll and hot-glue your own from poster board |
| Wooden dowels, skewers, or paper sticks | The handle to hold it up | Insert into the cone before adding fiber |
| Fabric-safe or craft spray paint | Sickly color and grime | Faded pink, bruised purple, moldy green, dingy gray |
| Hot glue gun | Anchors fiber to the cone and stick | Work in thin dabs so glue does not show |
| Brown or black acrylic wash | Aging and “dirt” | Watered down and dry-brushed into the tufts |
| Fake flies, bugs, or faux cobweb | The “rotten” details | A few go a long way — do not overload |
| Matte clear sealant (optional) | Locks color and controls shedding | Light coat only; test on a scrap first |
If you are staging a whole midway rather than a single prop, our guide to building a creepy carnival scene shows where a concession prop like this fits, and the beginner’s home haunt guide covers pacing your first full display.
How do you make rotten candy, step by step?
- Prep the cone. Roll card stock into a cone and hot-glue the seam, or use a pre-made paper cone. Push a dowel or skewer up through the point so you have a handle, and glue it in place.
- Fluff the fiber. Pull a handful of fiberfill apart with your fingers until it is airy and wispy — spun, not solid. This teasing step is what sells the cotton-candy texture.
- Color it while loose. Lay the teased fiber on a drop cloth outdoors and mist it with spray paint in a faded, off color. Do not coat it evenly — patchy color with white showing through looks far more like real (then spoiled) candy. Let it dry fully.
- Shape it onto the cone. Wrap the colored fiber around the top of the cone in a rounded, lopsided mound and tack it down with thin dabs of hot glue. Keep the silhouette a little sagging and irregular rather than a perfect ball.
- Rot it out. Dry-brush a watered-down brown or black wash into the low spots and edges to read as grime and decay. Matte the brightest areas down so nothing looks fresh.
- Add the infestation. Tuck a few fake flies or a wisp of faux cobweb into the tufts. A little is creepier than a lot — you want “abandoned,” not “bug store.”
- Seal (optional). A light coat of matte clear sealant locks the color and cuts down on shedding for outdoor use. Test on a scrap first, since some sealants darken paint.
Make several cones in mismatched sickly colors and stand them in a jar, a crooked rack, or a dead vendor’s hand for the strongest effect.
How do you make it look convincingly rotten?
The trick is restraint and reference. Picture what actually happens to sugar left out for years: it dulls, grays, collapses, and attracts dust and pests. So fade your colors rather than brightening them, keep the shape slumped and uneven, and let the grime settle into crevices the way real dirt would. A few strategic details — one drooping tuft, a scatter of flies on just one cone, a faint cobweb bridging two — read as decay far better than drenching everything. Mismatched colors across a cluster (a bruised purple next to a jaundiced yellow) also make the batch look old and forgotten instead of freshly made.
How do you display and light rotten candy in a carnival scene?
Placement and light do most of the theatrical work. Cluster the cones at a fake concession stand, spilling from a tipped-over box, or clutched in a slumped clown’s hand so the story reads at a glance. Then light it cold and low: a pair of colored LED spotlights in sickly green or purple drains the last cheer out of the scene, while a strand of dim battery LED fairy lights mimics a broken-down midway booth. Our full guide to DIY home-haunt lighting covers color and placement in depth.
To finish the abandoned-fairground mood, let a thin layer of haze drift across the ground with a low-lying fog machine — our guide to low-lying ground fog shows how to keep it hugging the floor instead of rising into a cloud. Fog plus cold light turns a handful of craft-store fiberfill into a scene people photograph.
Frequently Asked Questions
Is rotten candy safe to make and display?
Yes, as a decoration. It is built from craft materials and paint and is never edible, so keep it away from food areas and out of reach of small children who might not know the difference. Because spray-painted fiberfill is flammable, keep it clear of open flame and hot bulbs and light it only with battery LED fixtures.
What can I use instead of polyester fiberfill?
Teased-out quilt batting, pulled-apart cotton balls, or even fine faux spiderweb material all give a similar spun texture. Fiberfill is the cheapest and easiest to color, but anything light and wispy that holds spray paint will work.
How long does one cone take to make?
About 15 to 20 minutes of hands-on work per cone, plus drying time between the paint and the aging wash. A cluster of six for a concession display is a comfortable afternoon project.
Can rotten candy go outside?
Yes, in a covered spot. Seal the paint with a light matte clear coat, keep it out of direct rain so the fiberfill does not mat down, and bring it in during storms. Fiberfill dries slowly once soaked.
What colors look the most rotten?
Faded, desaturated versions of candy colors read best — bruised purple, jaundiced yellow, moldy green, and dingy gray-pink. Leaving white patches showing through and dry-brushing brown grime into the low spots does more than any single color.
Building the whole midway? Start with our creepy carnival scene guide and add your rotten candy to the concession stand.

As an Amazon Associate we may earn commission from qualifying purchases at no extra cost to you.
new in halloween animatronics
Our honest Spirit Halloween 4 Ft 4 In Harvey Carvey review: a jack-o-lantern-headed creepy kid with knife and spoon for $165.99. We score it 3.5 of 5.
Our honest Spirit Halloween 6 Ft 11 In Lady Misfortune review: a near-7-foot color-changing witch with a crystal ball for $109.99. We score it 3.4 of 5.
Our honest Spirit Halloween 9 Ft 5 In Sinister Straw Man review: a $385.99 giant that springs up to 9 feet with glowing eyes. We score it 3.6 out of 5.
Find Haunted Houses in:
trending in haunt industry
Everything you need to know about East Coast Haunters Convention 2026 — dates, location, what to expect, haunt tours, seminars, and how to get tickets before prices increase.
HalloweenCostumes.com's 2026 Fan Design Program lets you design a real Halloween animatronic. Two winners get 10 props each plus 5% revenue. Submissions close April 30.
ShudderCon 2026 runs April 25–26 at Camp Jordan Arena in East Ridge, TN. Tickets from $15–$75. Here's the full preview for horror fans, haunt pros, and scare actors.