

How to Light Your Home Haunt: A DIY Halloween Lighting Guide
Haunt Harvester is reader-supported. If you buy through links on this page we may earn a commission at no extra cost to you.
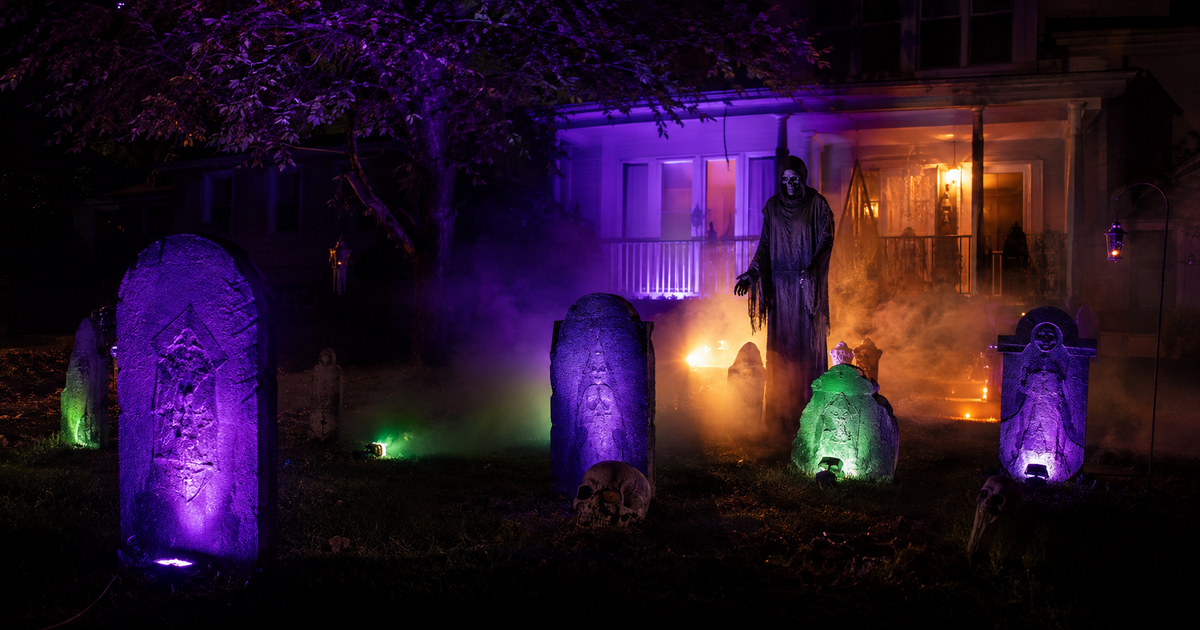
Lighting your home haunt comes down to three moves: choose eerie colors (deep purple, green, and amber beat plain white), light from low angles to throw long shadows, and keep bright light off the faces and props you want hidden until the last second. With a handful of outdoor-rated LED spotlights, colored bulbs, and a few extension cords, most yards can be transformed for well under $100. The one non-negotiable safety rule is to power anything outdoors only through outdoor-rated, GFCI-protected outlets and cords.
Great home-haunt lighting is the difference between a yard full of props and a scene that actually unsettles people. It is also one of the cheapest upgrades you can make – color, angle, and shadow do far more work than expensive gear. This guide walks through the gear, the technique, and the safety rules, step by step.
What You Need to Light a Home Haunt
| Item | Estimated Cost | Where to Buy |
|---|---|---|
| Outdoor-rated LED spotlights / floods (color-changing or single color) | $10-$25 each | Home Depot, Lowe’s, Amazon |
| Colored LED bulbs (purple, green, red, amber) | $4-$10 each | Hardware and party stores |
| Color gels or theatrical filters (to tint white lights) | $8-$15 per pack | Amazon, theater-supply stores |
| Outdoor-rated extension cords and a power strip | $12-$25 | Any hardware store |
| Outdoor timer or smart plugs | $10-$20 | Hardware and home stores |
| Ground stakes, zip ties, and gaffer tape | $5-$15 | Hardware store |
Two upgrades that punch above their price: UV black lights and color-changing LED strip lights.
Costs are typical ranges, not fixed prices – check current pricing at the retailer. You do not need every item; a starter kit is a few color-changing floods, some colored bulbs, and an outdoor cord.
How Should You Plan Your Haunt Lighting?
Start with color, not brightness
Plain white light flattens a scene and reads as a porch light, not a haunt. Deep, saturated colors sell the mood: purple and green feel supernatural, amber and warm orange feel like firelight and fall, and a single hit of red marks danger. Pick one or two dominant colors for the whole yard and use others as accents, so the scene looks designed rather than like a string of random bulbs.
Remember that darkness is the effect
The scariest part of any haunt is what people cannot quite see. Resist the urge to light everything. Leave pools of shadow between your lit areas, keep the overall level low, and let props emerge from the dark instead of sitting in a floodlit display. If your neighbors can read a book in your yard, it is too bright.
Light from below and behind
We are used to light coming from above, so light from the wrong direction instantly feels wrong. Uplighting – a spotlight on the ground aimed up at a face or tree – throws long, distorted shadows and makes ordinary props look monstrous. Backlighting turns figures into black silhouettes. Both are the core tricks of horror lighting.
Step-by-Step: Lighting Your Yard Haunt
Step 1 – Turn off the everyday lights
Start by killing porch lights, garage lights, and anything that spills white light across the scene. Work at night so you are building on the actual darkness your visitors will see, not guessing in daylight.
Step 2 – Uplight your key props
Place a spotlight on the ground in front of your best prop – a tombstone, a reaper, an animatronic – and aim it up. Angle it slightly to one side so the shadow falls dramatically rather than flat. This single move is what makes cheap props look expensive.
Step 3 – Add color in layers
Swap in your dominant color first and set the overall wash, then add one accent color where you want the eye to land. A green-lit yard with one red-lit doorway tells people exactly where to look, and where to be afraid.
Step 4 – Create silhouettes
Put a light behind a figure, a fence, or a bush and aim it away from your visitors so the object goes black against a glowing background. Silhouettes read instantly and hide the fact that a prop is cheap or unfinished.
Step 5 – Hide the source
Never let a bare bulb shine into a visitor’s eyes – it kills the atmosphere and ruins their night vision. Tuck fixtures behind tombstones, into bushes, or below the sight line, and tape or stake down the cords so nothing shows or trips anyone.
Step 6 – Add movement and flicker
Static light is calm; flickering light is alive. Use flame-flicker bulbs, a strobe used sparingly at one choke point, or lights on a timer or smart plug so the scene changes as people move through it. A little motion in the light does more than another prop.
How Do You Tie Lighting Into the Rest of the Haunt?
Lighting is the layer that makes everything else land. Aim a low light through a fog bank and the beam becomes a solid, glowing wall – see our home-haunt fog guide for how to build the haze it needs. Sync a flicker or a strobe to your audio cues and a scare hits harder; our DIY haunted house sound design guide covers the audio side. And if you plan your light positions at the same time as your walking path and prop placement, using our home haunt layout guide, you avoid the classic mistake of lighting a scene people approach from the wrong angle.
What Are the Safety Rules?
Outdoor lighting means electricity near people, weather, and foot traffic, so a few rules are non-negotiable. Use only outdoor-rated (marked for outdoor use) extension cords and fixtures outside, and plug everything into a GFCI-protected outlet, which cuts power instantly if it senses a fault. Do not daisy-chain power strips or overload a single circuit – spread the load across outlets. Keep connections up off wet ground, drip-loop your cords so water runs away from the plug, and tape or stake every cord that crosses a path so no one trips. Bring non-outdoor gear inside, and never run more wattage through a cord than it is rated for.
Budget Variations
Under $50 – starter
Two or three color-changing LED floods, a pack of colored bulbs for existing fixtures, and one outdoor extension cord. Focus everything on uplighting your best two props and silhouetting one figure.
Around $150 – scene builder
Add more floods for full-yard color washes, an outdoor timer or smart plugs for automation, and a flame-flicker or single strobe for a key moment. Enough to light a whole front-yard scene with intent.
Premium – full show
Layer in color gels, dedicated pathway lighting, and app- or DMX-controlled fixtures that change with sound and motion, building toward a lighting show that moves visitors through the haunt.
Frequently Asked Questions
What color light is best for a haunted house?
Deep, saturated colors work best – purple and green for a supernatural feel, amber for firelight, and a single hit of red for danger. Pick one or two dominant colors and use others sparingly as accents. Avoid plain white, which flattens the scene.
How do I make cheap props look scary with lighting?
Uplight them. Put a spotlight on the ground and aim it up at the prop to throw long, distorted shadows, and silhouette figures by backlighting them. Angle and shadow do more for a cheap prop than any amount of detail.
Do I need special outdoor lights for a home haunt?
For anything outside, yes – use fixtures and extension cords marked outdoor-rated, and plug into a GFCI-protected outlet. Indoor-only gear can fail or become a hazard in damp weather.
How much does it cost to light a home haunt?
A basic setup of a few color-changing floods, colored bulbs, and an outdoor cord runs well under $100. You can scale up to $150 or more with automation, flicker effects, and full-yard color washes.
How do I keep haunt lighting safe outdoors?
Use outdoor-rated cords and fixtures, GFCI outlets, and avoid overloading circuits. Keep connections off wet ground, drip-loop cords away from plugs, and stake or tape down anything crossing a walkway.
Ready to build the rest of the scene? Start with our beginner’s home haunt guide, then add atmosphere with our home-haunt fog guide.

As an Amazon Associate we may earn commission from qualifying purchases at no extra cost to you.
new in halloween animatronics
Home Depot's 11 ft Giant Mummy animatronic (2026) is a poseable under-$300 yard giant. See its specs, price, where to buy it, and whether it is worth it.
Spirit Halloween's Trash Bandit is a 3 ft 7 in radioactive-raccoon animatronic for 2026 at $149.99, with a pop-up scare, growls, and glowing blacklight decay.
Home Depot's John the Last Call Mixologist is a 6 ft animated bar skeleton for 2026 at about $179. See what it does, where to buy it, and if it is worth it.
Find Haunted Houses in:
trending in haunt industry
Everything you need to know about East Coast Haunters Convention 2026 — dates, location, what to expect, haunt tours, seminars, and how to get tickets before prices increase.
HalloweenCostumes.com's 2026 Fan Design Program lets you design a real Halloween animatronic. Two winners get 10 props each plus 5% revenue. Submissions close April 30.
ShudderCon 2026 runs April 25–26 at Camp Jordan Arena in East Ridge, TN. Tickets from $15–$75. Here's the full preview for horror fans, haunt pros, and scare actors.