

How to Build a Halloween Graveyard Scene: Layout, Fog, Lighting and Props
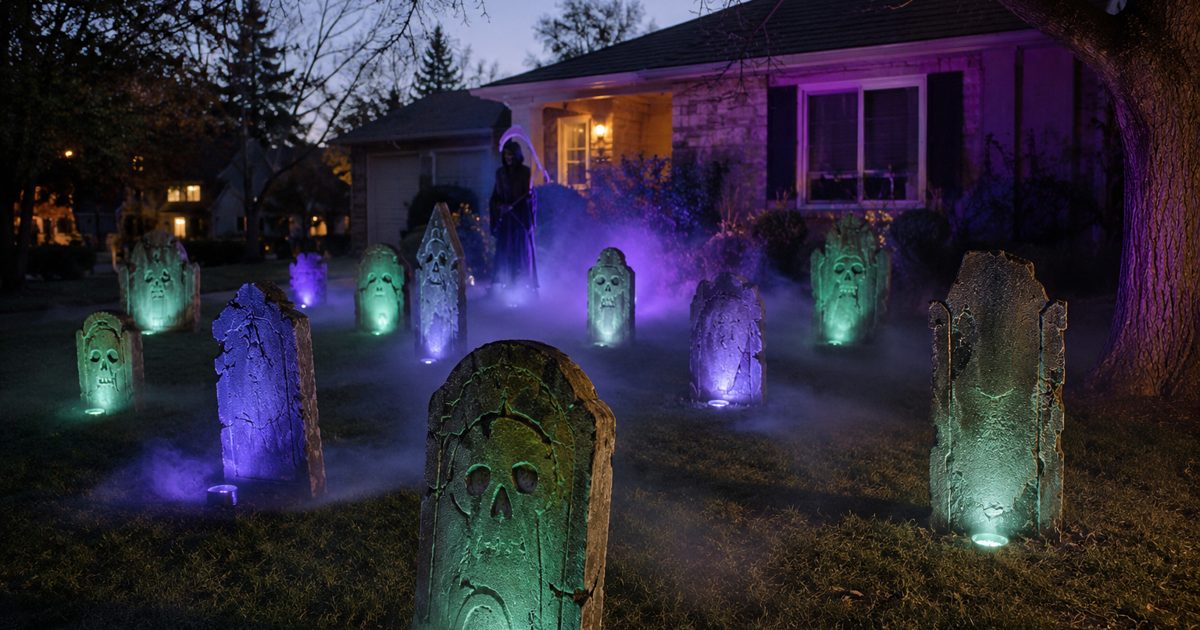
To build a Halloween graveyard scene that actually reads at night, start with layout instead of props: stagger tombstones of different heights so the scene has depth, then add creeping ground fog, low colored lighting, and a few weathered details like moss, cracks, and one leaning stone. The fog and the lighting are what sell it. A flat row of even tombstones under a porch light looks like decoration, while an uneven, fog-wrapped, side-lit cluster looks like a real graveyard.
A graveyard is the most forgiving big scene a home haunter can build. It scales from a $60 cluster of foam stones to a full walk-through with fog, lighting, and animatronics, and almost every piece stores flat and comes back next year. The trick is that a graveyard is not a pile of tombstones. It is a layout problem, a fog problem, and a lighting problem, and getting those three right matters more than how many stones you own.
What do you need to build a Halloween graveyard scene?
You can build a convincing graveyard with five categories of gear. Everything below is a starting kit, not a shopping mandate. Start with tombstones and fog, then add lighting and props as the budget allows.
| Element | What it does | Typical starting point |
|---|---|---|
| Tombstones | The backbone of the scene; sets scale and depth | 5–9 stones, mixed heights |
| Ground fog | Turns a static yard into a living scene | Fog machine plus a chiller or ice |
| Lighting | Directs the eye and creates shadows after dark | 2–4 low colored spotlights |
| Props | Detail and story: groundbreakers, hands, a ghost | 1–2 focal pieces |
| Power and safety | Runs the scene safely outdoors | GFCI outlet, outdoor cords, a timer |
If you are building your very first yard from nothing, it helps to plan a budget home haunt under $200 before you buy anything, so the graveyard fits a wider display instead of eating the whole budget.
How do you lay out a graveyard so it looks real?
Layout is the single biggest difference between a scene that reads and one that looks like clearance decor. Real cemeteries are uneven, and your yard should be too. Work these principles in order.
Stagger heights and depth
Place your tallest stones and any monuments at the back, mid-size stones in the middle, and short markers up front. This forced perspective gives a small yard the feeling of a much larger field. Never line stones up in a straight, evenly spaced row; offset them, angle a few, and let one lean as if the ground shifted years ago.
Build around a focal point
Give the eye somewhere to land: a groundbreaker skeleton clawing out of the lawn, a large central monument, or a single animatronic. Everything else supports that focal piece. If you are planning a larger display, our guide to planning your home haunt layout from scratch covers sightlines and traffic flow that apply directly to a graveyard.
Leave a path and a threshold
If trick-or-treaters walk through or past the scene, define the route with a low border or lighting, and mark the entrance. A DIY gothic cemetery gate at the threshold instantly frames the whole yard as a graveyard before anyone sees a single stone.
How do you make DIY tombstones that hold up?
The cheapest realistic tombstones are cut from two-inch rigid foam insulation board. Draw your shape, cut it with a jigsaw or a long knife, then bevel and round the edges so it does not look like a flat sheet. Carve random cracks, chips, and a shallow name panel with a box cutter, and dab the surface with a wadded plastic bag or a wire brush to add stone texture.
Paint in layers: a flat gray or brown base coat, a lighter dry-brushed highlight to catch the texture, and a thin, watered-down black wash pulled into the cracks for age. A quick pass of stone-texture spray paint sells it further. Real foam is light, so it will blow over or walk off in wind. Anchor each stone with a rebar or PVC stake driven through the base into the ground, and weigh the base with a brick or landscape spike. For a full step-by-step on shaping and weathering, weathering a foam stone follows the same method used for larger yard props.
How do you get that low, creeping graveyard fog?
Fog is what turns a static display into a scene, but standard fog rises and drifts away. For that classic graveyard look you need low-lying fog that clings to the ground and weaves between the stones. There are two reliable ways to get it: a purpose-built low-lying fog machine, or a standard fog machine paired with a chiller.
The DIY chiller is a cooler or tub packed with ice, with the fog piped in one end through PVC or dryer hose and out the other at ground level. The cold drops the fog so it rolls instead of rising. Our walkthrough on how to build a fog effect for your home haunt covers the chiller build in detail, and if you are choosing hardware, start with our guide to the best fog machines for Halloween and home haunts.
Two field notes. Fog fights wind, so a sheltered, low corner of the yard holds it far better than an open lawn, and running it in short bursts on a timer keeps the effect thick without emptying the tank by 8 p.m. Never assume neighbors, asthma, or road visibility will tolerate heavy fog; keep it off the sidewalk and the street.
How should you light a Halloween graveyard scene?
Lighting is where most yards fall flat, because a single bright porch light erases every shadow you worked to create. The goal is low, colored, directional light.
- Go low and uplight. Place small spotlights at ground level, angled up at the stones and props. Uplighting throws long shadows and makes faces and figures look wrong in the best way.
- Pick a palette. Green, deep purple, and cold blue read as eerie; a single amber or orange accent adds warmth without killing the mood. Avoid flat white.
- Add motion and flicker. Faux-candle lanterns and flickering bulbs suggest life among the dead. A slow color-fade bulb behind a monument adds subtle movement.
- Do not blind anyone. Angle lights away from the sidewalk and driver eyeline, and use outdoor-rated LED, solar, or battery fixtures so nothing overheats.
Light and fog work together: a spotlight cutting through low fog is the single most photographed effect in any home graveyard, so aim at least one beam across the fog line.
How do you add props and animatronics without overdoing it?
Restraint reads as realism. A handful of well-placed props beats a yard crammed with everything you own. Groundbreaker skeletons and reaching hands sell the idea that something is coming up through the soil. A tattered chicken-wire ghost floating among the stones adds height and motion for almost nothing.
One animatronic can anchor the whole scene: a fog-shrouded reaper that turns, a rising ghoul, or a giant skeleton looming at the back. Let it be the focal point and keep the rest quieter so the movement lands. Our Halloween animatronics guides break down which pieces work as a graveyard centerpiece and which are better up close. Whatever you add, leave gaps and negative space; an empty, fog-filled stretch between stones is scarier than a full one.
What should you know before you build?
- Plan for weather. Foam blows over, cardboard melts, and cheap electronics die in rain. Anchor everything and keep non-rated gear covered or bring it in overnight.
- Respect the power. Run everything from a GFCI outlet with outdoor-rated cords, avoid overloading a single circuit, and put the display on a timer so it is not running unattended all night.
- Build for storage. Flat foam stones, collapsible props, and labeled bins mean next October is setup, not a rebuild.
- Scale to your budget. A starter graveyard can be a fog machine and five DIY stones; a premium one layers in lighting, multiple animatronics, and a gated entrance. Add one category a year and the scene compounds.
Build the scene: gear that makes a graveyard land
The DIY stones and layout are free-to-cheap; the gear that makes them read at night is where a few smart buys pay off. These are the categories worth prioritizing, roughly highest impact first. Every link below is tagged and we may earn a commission at no extra cost to you.
Haunt Harvester is reader-supported and may earn a commission from qualifying purchases made through links on this page, at no extra cost to you. We only feature products we would tell a friend about.
- Low-lying fog machine — the fastest way to get creeping, ground-hugging graveyard fog without a DIY chiller.
- Standard fog machine — pair it with an ice chiller for low fog, or use it for a general haze.
- Fog juice — buy more than you think you need; a graveyard on a timer drinks fluid over a night.
- Color-changing outdoor spotlights — green and purple uplighting is what turns flat stones into a scene.
- Outdoor timer or smart plug — run fog and lights in scheduled bursts so the effect stays strong all evening.
- Foam tombstones — a fast base set to mix in with your DIY stones for instant depth.
- Heavy-duty outdoor extension cord — power the display safely from a GFCI outlet without daisy-chaining thin cords.
Frequently Asked Questions
How much does it cost to build a Halloween graveyard scene? A basic scene of five DIY foam tombstones and a fog machine can come in under $80. Adding colored lighting, a groundbreaker prop, and a timer pushes a mid-range yard to a few hundred dollars, and a premium graveyard with animatronics and a gated entrance scales from there.
What is the best fog for a graveyard? Low-lying fog that hugs the ground, not standard rising fog. Use a purpose-built low-lying fog machine, or run a standard machine through an ice-packed chiller so the fog cools and rolls between the stones.
How do I keep foam tombstones from blowing over? Anchor each one with a rebar or PVC stake driven through the base into the ground, and weigh the base with a brick or landscape spike. Light foam will walk off in wind if it is only resting on the grass.
How many tombstones do I need? Five to nine is enough for a strong small-yard scene if you vary the heights and stagger the spacing. Depth and unevenness matter far more than sheer quantity.
What color lights look best in a graveyard? Green, deep purple, and cold blue read as eerie, with a single amber accent for warmth. Keep the light low and uplit, and avoid bright white porch light, which flattens every shadow.
Ready to build the rest of the yard? Browse our Halloween animatronics guides to pick the centerpiece that anchors your graveyard.

As an Amazon Associate we may earn commission from qualifying purchases at no extra cost to you.
new in halloween animatronics
Our honest Spirit Halloween 4 Ft 4 In Harvey Carvey review: a jack-o-lantern-headed creepy kid with knife and spoon for $165.99. We score it 3.5 of 5.
Our honest Spirit Halloween 6 Ft 11 In Lady Misfortune review: a near-7-foot color-changing witch with a crystal ball for $109.99. We score it 3.4 of 5.
Our honest Spirit Halloween 9 Ft 5 In Sinister Straw Man review: a $385.99 giant that springs up to 9 feet with glowing eyes. We score it 3.6 out of 5.
Find Haunted Houses in:
trending in haunt industry
Everything you need to know about East Coast Haunters Convention 2026 — dates, location, what to expect, haunt tours, seminars, and how to get tickets before prices increase.
HalloweenCostumes.com's 2026 Fan Design Program lets you design a real Halloween animatronic. Two winners get 10 props each plus 5% revenue. Submissions close April 30.
ShudderCon 2026 runs April 25–26 at Camp Jordan Arena in East Ridge, TN. Tickets from $15–$75. Here's the full preview for horror fans, haunt pros, and scare actors.