

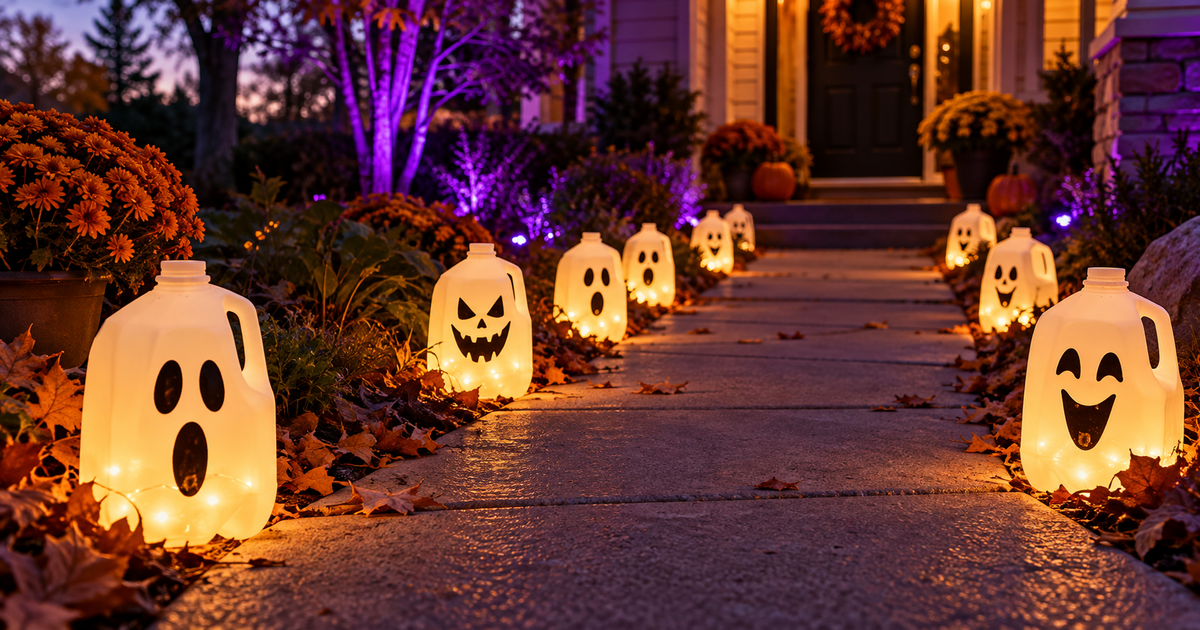
How to Make DIY Milk Jug Ghost Luminaries for Halloween (Sitting and Hanging)
To make a milk jug ghost luminary, clean a plastic jug, draw a face with a black permanent marker, push a battery light string or flameless tea lights inside and replace the lid. It takes about 25 minutes per ghost, per one tutorial, and costs almost nothing if you recycle the jug. Use LED lights, never real candles, because flames can melt the plastic.
A milk jug ghost is one of the cheapest Halloween lights you can make: a rinsed jug becomes a glowing face for a porch, walkway or window. Put a few along a path or tuck one into a flameless LED tea light setup, and you have yard lighting in an afternoon. Here are two proven versions, a sitting ghost and a hanging ghost.
What do you need for milk jug ghost luminaries?
| Item | Why you need it | Source note |
|---|---|---|
| 1 clean, dry plastic milk jug (gallon or half gallon) | The ghost body | Welcome to Nana’s |
| Battery fairy lights, flameless tea lights or glow sticks | The glow | Both sources |
| Black permanent marker | Draws the face | Welcome to Nana’s |
| Goo Gone label remover | Removes the label and date stamp | Welcome to Nana’s |
| Sand or gravel (sitting ghost) | Weights the base against wind | Both sources |
| ½ yard white fabric, stapler, 2 ft string, craft knife (hanging ghost) | The ghost’s tail and hanger | Welcome to Nana’s |
How do you make a sitting milk jug ghost?
This follows Shelly at Welcome to Nana’s (last updated October 13, 2025), who lists 5 minutes of prep and 20 minutes of work for one ghost.
- Clean the jug. Wash it, dry it and remove the label and date stamp with Goo Gone.
- Draw a face. Use the black permanent marker on one side.
- Add light. Test the lights first, feed the strand in, keep the switch outside, tape it to the handle and replace the lid.
- Weight the base. Add sand or gravel so it does not tumble in the wind.
How do you make a hanging ghost?
- Cut off the bottom of the jug with a craft knife or scissors.
- Add the tail. Cut the fabric into 2-inch strips and staple them around the open edge.
- Add the hanger. Cut two small holes on either side of the lid, thread the string through and knot it.
- Secure the lights. Loosely knot the light strand so it stays inside when hung.
Can you use a stencil or vinyl instead of a marker?
Yes. Kimberly at Single Girl’s DIY (updated August 11, 2024) cuts a ghost face from black vinyl on a Cricut machine and transfers it to the jug, but notes a Sharpie and a template work too. She also says to skip real candles because the flame can melt the plastic, and that battery lights suit places without an outlet, like a driveway.
Which lighting should you use?
| Light | Best for | Note |
|---|---|---|
| Battery fairy lights | Walkways and yards | No outlet needed |
| Flameless tea lights | Porch steps and windowsills | Cooler than a flame |
| Glow sticks | One-night parties | Short-lived |
| Plug-in lights | Near an outlet | Check outdoor ratings; see our outdoor power safety guide |
Safety note: use a craft knife carefully, and keep real candles out of plastic jugs. Neither source gives full outdoor safety guidance, so this is ours: bring them in before heavy rain.
Pair your ghosts with a chicken wire ghost, a disco ghost or a full graveyard scene, and soften the glow with floating candles.
Frequently Asked Questions
How long does one milk jug ghost take? About 25 minutes: 5 of prep and 20 of work, per Welcome to Nana’s.
Can I use a real candle inside? No. Single Girl’s DIY warns that a flame can melt the plastic. Use LED lights.
How do I stop ghosts blowing away? Add sand or gravel to the bottom of the jug.
How do I get the label off? Welcome to Nana’s recommends Goo Gone. She found a harsher remover smelly.
Do I need a Cricut? No. A black permanent marker and a hand-drawn face work.
Ready for more? Build a graveyard scene to showcase them.

As an Amazon Associate we may earn commission from qualifying purchases at no extra cost to you.
new in halloween animatronics
Buying a used or resold Halloween animatronic? Use this checklist to test motion, sound and sensors, judge a fair price and pay safely before you buy.
When is the best time to buy Halloween animatronics? Compare preseason launches, late-October markdowns, post-Halloween clearance and off-season buying to save.
Lowe's cut 9 Haunted Living and Disney animatronics 30-55%. See which markdowns are the best value per foot, which to skip, and how to check price and stock.
Find Haunted Houses in:
trending in haunt industry
Everything you need to know about East Coast Haunters Convention 2026 — dates, location, what to expect, haunt tours, seminars, and how to get tickets before prices increase.
HalloweenCostumes.com's 2026 Fan Design Program lets you design a real Halloween animatronic. Two winners get 10 props each plus 5% revenue. Submissions close April 30.
ShudderCon 2026 runs April 25–26 at Camp Jordan Arena in East Ridge, TN. Tickets from $15–$75. Here's the full preview for horror fans, haunt pros, and scare actors.