

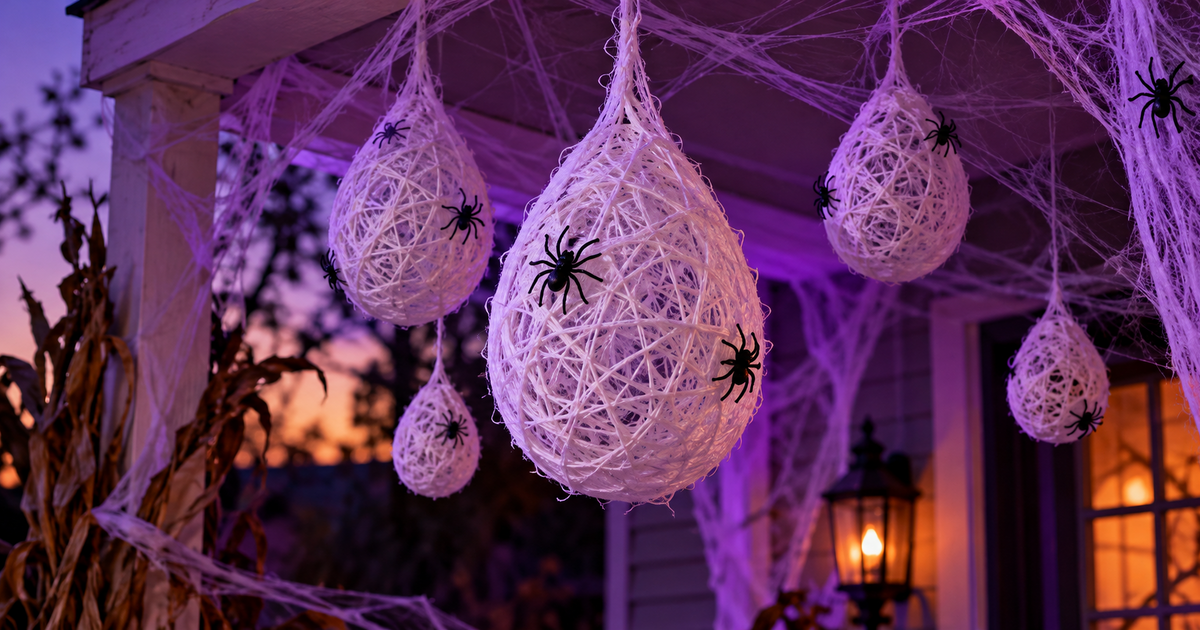
How to Make DIY Spider Egg Sacs for Halloween with Yarn and Balloons
To make a DIY spider egg sac, soak white yarn in a half-and-half mix of white glue and water, wrap it around an inflated balloon in every direction, let it dry for at least 24 hours, then pop the balloon and hang the hollow sac. Craft blogger Nell Regan Kartychok of Rhythms of Play says to vary the balloon size for a more realistic cluster.
Spider egg sacs are one of the cheapest ways to make a porch, tree or doorway look infested. All you need is yarn, glue and a few balloons, plus a handful of plastic spiders to crawl over the finished sacs. Here is the full method, step by step, with the one thing you cannot rush: drying time.
What do you need to make spider egg sacs?
| Item | What it does |
|---|---|
| White acrylic yarn | Forms the sac’s stringy shell |
| Small water balloons or regular balloons | The mold; small ones make small sacs, regular ones make large sacs |
| Washable white school glue | Stiffens the yarn when dry |
| A glass bowl and water | For the 1:1 glue mix; hardened glue scrubs off glass with steel wool |
| Clear monofilament fishing line | Hangs each sac, cut 12 to 36 inches long |
| Plastic spiders or spider rings | The finishing touch |
| Large-eye needle, scissors or a sharp knife | Pops the balloons |
How do you make a spider egg sac step by step?
These steps follow the Rhythms of Play tutorial (first published September 10, 2018, updated August 30, 2025).
- Inflate the balloons. Use small ones for small sacs and regular ones for large sacs, and vary how full you blow them up so the sacs come out in different sizes.
- Mix the glue. Combine equal parts white glue and water in the bowl.
- Soak the yarn. Drop the yarn in and leave a loose end hanging over the rim so it is easy to find.
- Wrap the balloon. Wind the wet yarn around the balloon in several directions until it looks like an egg.
- Hang to dry. Tie a piece of dry yarn to the balloon’s knot and hang it for at least 24 hours while the yarn stiffens.
- Pop and remove the balloon. Use a needle, scissors or a knife, then ease the balloon out gently so the sac does not collapse.
- Add the hanger and spiders. Tie on the fishing line and set a few plastic spiders on the sac.
Where should you hang spider egg sacs?
| Spot | Why it works |
|---|---|
| Porch overhang | Sheltered, and the source hangs hers on the porch beside a giant stick spider web |
| Tree branches | Named in the tutorial as a hanging spot |
| Ceilings and beams | Good for indoor haunts and party rooms |
Build the matching web with our guide to realistic spider webs, then place the sacs inside a haunted forest scene. If you are working to a limit, the budget home haunt build guide shows where yarn-and-glue projects fit.
Safety and weather note: the tutorial gives no weatherproofing guidance, so this part is ours. Glue-stiffened yarn can soften when it gets wet, so hang the sacs under cover and bring them in before heavy rain. Use a needle or scissors away from your face when popping balloons, and keep the glue and sacs away from candles or other open flames.
Frequently Asked Questions
How long do spider egg sacs take to dry? Hang them for at least 24 hours, according to Rhythms of Play. The tutorial does not give total active time.
What is the glue-to-water ratio? Equal parts white glue and water.
How do you make the sacs different sizes? Use small water balloons for small sacs and regular balloons for large ones, and inflate them to different levels.
Can you use them outside? The source hangs them on a porch and from tree branches, but gives no weather advice. Keep them sheltered and bring them in when rain is forecast.
What if the sac collapses when the balloon is popped? Remove the balloon slowly and gently. Wrapping more yarn in more directions and letting it dry fully also helps, as a general crafting tip of ours.
Ready to finish the scene? Make realistic spider webs to go with your sacs.

As an Amazon Associate we may earn commission from qualifying purchases at no extra cost to you.
new in halloween animatronics
Buying a used or resold Halloween animatronic? Use this checklist to test motion, sound and sensors, judge a fair price and pay safely before you buy.
When is the best time to buy Halloween animatronics? Compare preseason launches, late-October markdowns, post-Halloween clearance and off-season buying to save.
Lowe's cut 9 Haunted Living and Disney animatronics 30-55%. See which markdowns are the best value per foot, which to skip, and how to check price and stock.
Find Haunted Houses in:
trending in haunt industry
Everything you need to know about East Coast Haunters Convention 2026 — dates, location, what to expect, haunt tours, seminars, and how to get tickets before prices increase.
HalloweenCostumes.com's 2026 Fan Design Program lets you design a real Halloween animatronic. Two winners get 10 props each plus 5% revenue. Submissions close April 30.
ShudderCon 2026 runs April 25–26 at Camp Jordan Arena in East Ridge, TN. Tickets from $15–$75. Here's the full preview for horror fans, haunt pros, and scare actors.